The Rise of the Full-Stack Mobile Developer
In today’s fast-paced digital landscape, the line between frontend and backend development is increasingly blurred, especially in the mobile application sphere. To build truly effective, dynamic, and scalable mobile apps, developers must possess a holistic understanding of the entire application stack. This means mastering not only the user interface but also the underlying data management, authentication, and server-side logic. The latest React Native News often highlights this trend, showcasing a move towards more integrated development workflows.
This article serves as a comprehensive guide to building a modern, full-stack mobile application. We will leverage the power of React Native for creating a beautiful, cross-platform frontend and Supabase, a robust open-source Backend-as-a-Service (BaaS), to handle all our backend needs. We’ll walk through the entire process, from initial setup to implementing advanced real-time features, providing practical code examples and best practices along the way. By the end, you’ll have a clear roadmap for building your own full-stack mobile applications efficiently and effectively.
Section 1: The Foundation: Setting Up Your Full-Stack Environment
Choosing the right tools is the first critical step in any project. The combination of React Native and Supabase offers a potent mix of developer experience, performance, and scalability. It allows a single developer or a small team to build and launch a feature-rich application without the overhead of managing traditional backend infrastructure.
Why React Native and Supabase?
React Native, backed by Meta, allows you to build native mobile apps for iOS and Android using a single JavaScript codebase. Its “learn once, write anywhere” paradigm, combined with a vast ecosystem of libraries, makes it a top choice for mobile development. The latest Expo News reveals an even more streamlined development experience, abstracting away much of the native configuration complexity and providing tools for building, testing, and deploying apps with ease.
Supabase emerges as a powerful open-source alternative to Google’s Firebase. It provides all the essential backend services you need, built on top of enterprise-grade tools, most notably a dedicated PostgreSQL database for every project. This gives you full database control, including the ability to write complex queries and set up relational data models. Supabase bundles authentication, object storage, and serverless Edge Functions, making it a complete backend solution.
Initial Project Setup and Connection
Let’s begin by scaffolding our projects. First, we’ll create a new React Native application using the Expo CLI, which is the recommended approach for most new projects.
# Ensure you have Node.js and the Expo CLI installed
# npm install -g expo-cli

npx create-expo-app fullstack-news-app
cd fullstack-news-app
Next, head over to the Supabase website, create an account, and start a new project. Once your project is provisioned, navigate to the “API” settings in your project dashboard. You will find your Project URL and `anon` (public) key. These are the credentials we need to connect our React Native app to our Supabase backend.
Now, let’s install the Supabase client library in our React Native project and create a central file to initialize the client. It’s crucial to store your API keys in environment variables rather than hardcoding them.
npm install @supabase/supabase-js
# For environment variables in Expo
npm install @react-native-async-storage/async-storage
# Create a .env file in your root directory
# EXPO_PUBLIC_SUPABASE_URL=YOUR_SUPABASE_URL
# EXPO_PUBLIC_SUPABASE_ANON_KEY=YOUR_SUPABASE_ANON_KEY
Now, create a `lib/supabase.js` file to initialize and export the client for use throughout your application.

import 'react-native-url-polyfill/auto';
import AsyncStorage from '@react-native-async-storage/async-storage';
import { createClient } from '@supabase/supabase-js';

const supabaseUrl = process.env.EXPO_PUBLIC_SUPABASE_URL;
const supabaseAnonKey = process.env.EXPO_PUBLIC_SUPABASE_ANON_KEY;

export const supabase = createClient(supabaseUrl, supabaseAnonKey, {
  auth: {
    storage: AsyncStorage,
    autoRefreshToken: true,
    persistSession: true,
    detectSessionInUrl: false,
  },
});
This setup provides a reusable Supabase client instance. We’ve configured it to use `AsyncStorage` for persisting user sessions on the device, a critical step for a native mobile app experience.
Section 2: Building Core Features: Authentication and Data
With our foundation in place, we can start building the core functionalities of our news application: user authentication and data management for the articles.
Implementing User Authentication
Supabase provides a comprehensive authentication solution out of the box. Let’s build a simple sign-up screen. For handling form state and validation, the React Hook Form News consistently points to it as a top-tier library due to its performance and minimal re-renders. We’ll combine it with components from a UI library like React Native Paper News for a clean look.
Here’s an example of a `SignUpScreen` component:
import React from 'react';
import { View, Alert } from 'react-native';
import { Button, TextInput, Text } from 'react-native-paper';
import { useForm, Controller } from 'react-hook-form';
import { supabase } from '../lib/supabase';

export default function SignUpScreen() {
  const { control, handleSubmit, formState: { errors } } = useForm({
    defaultValues: {
      email: '',
      password: '',
    },
  });

  const onSubmit = async (data) => {
    const { email, password } = data;
    const { error } = await supabase.auth.signUp({
      email,
      password,
    });

    if (error) {
      Alert.alert('Sign Up Error', error.message);
    } else {
      Alert.alert('Success', 'Please check your email for a confirmation link.');
    }
  };

  return (
    <View style={{ padding: 20, justifyContent: 'center', flex: 1 }}>
      <Controller
        control={control}
        rules={{ required: true, pattern: /^\S+@\S+$/i }}
        render={({ field: { onChange, onBlur, value } }) => (
          <TextInput
            label="Email"
            onBlur={onBlur}
            onChangeText={onChange}
            value={value}
            autoCapitalize="none"
          />
        )}
        name="email"
      />
      {errors.email && <Text style={{ color: 'red' }}>This is required.}

      <Controller
        control={control}
        rules={{ required: true, minLength: 6 }}
        render={({ field: { onChange, onBlur, value } }) => (
          <TextInput
            label="Password"
            onBlur={onBlur}
            onChangeText={onChange}
            value={value}
            secureTextEntry
            style={{ marginTop: 10 }}
          />
        )}
        name="password"
      />
      {errors.password && <Text style={{ color: 'red' }}>Password must be at least 6 characters.}

      <Button mode="contained" onPress={handleSubmit(onSubmit)} style={{ marginTop: 20 }}>
        Sign Up
      </Button>
    </View>
  );
}
This component provides a complete, validated sign-up flow. For managing the global authentication state (i.e., knowing if a user is logged in across the app), you could use React’s Context API for simplicity or opt for a dedicated state management library like Zustand News or Redux News for more complex applications.
Fetching and Displaying News Articles
To display news, we first need a `posts` table in our Supabase database. You can create this easily via the Supabase dashboard’s SQL editor. For fetching and managing server state, the overwhelming consensus in the React Query News is that it’s the gold standard. It simplifies data fetching, caching, and synchronization, drastically reducing boilerplate code.
Let’s create a `NewsFeed` component that uses React Query’s `useQuery` hook to fetch and display posts.
import React from 'react';
import { View, FlatList, ActivityIndicator } from 'react-native';
import { Card, Text, Title } from 'react-native-paper';
import { useQuery } from '@tanstack/react-query';
import { supabase } from '../lib/supabase';

const fetchPosts = async () => {
  const { data, error } = await supabase
    .from('posts')
    .select('*')
    .order('created_at', { ascending: false });

  if (error) {
    throw new Error(error.message);
  }
  return data;
};

export default function NewsFeed() {
  const { data: posts, isLoading, isError, error } = useQuery({
    queryKey: ['posts'],
    queryFn: fetchPosts,
  });

  if (isLoading) {
    return <ActivityIndicator size="large" style={{ flex: 1 }} />;
  }

  if (isError) {
    return <Text>Error: {error.message}</Text>;
  }

  return (
    <FlatList
      data={posts}
      keyExtractor={(item) => item.id.toString()}
      renderItem={({ item }) => (
        <Card style={{ margin: 10 }}>
          <Card.Content>
            <Title>{item.title}</Title>
            <Text>{item.content.substring(0, 100)}...</Text>
          </Card.Content>
        </Card>
      )}
    />
  );
}
This component is declarative and robust. React Query handles loading and error states automatically. If the user navigates away and comes back, React Query will intelligently refetch the data in the background to ensure the feed is always up-to-date.
Section 3: Advanced Functionality and Real-Time Updates
A modern news app isn’t just a static list; it’s a dynamic, interactive experience. Supabase’s real-time capabilities and serverless functions allow us to build these advanced features with surprising ease.
Real-Time Subscriptions for a Live Feed

One of Supabase’s most compelling features is its ability to listen for database changes in real time. We can use this to automatically update our news feed whenever a new post is created, without requiring the user to manually refresh.
We can enhance our `NewsFeed` component with a `useEffect` hook to subscribe to these changes. The React Query client has a `setQueryData` method that allows us to imperatively update the cache, which will trigger a re-render with the new data.
import { useEffect } from 'react';
import { useQueryClient } from '@tanstack/react-query';
// ... other imports from NewsFeed component

export default function NewsFeed() {
  const queryClient = useQueryClient();
  const { data: posts, isLoading, ... } = useQuery(...); // Same as before

  useEffect(() => {
    const channel = supabase.channel('public:posts')
      .on('postgres_changes', { event: 'INSERT', schema: 'public', table: 'posts' }, (payload) => {
        console.log('New post received!', payload.new);
        // Update the React Query cache with the new post
        queryClient.setQueryData(['posts'], (oldData) => [payload.new, ...oldData]);
      })
      .subscribe();

    // Cleanup subscription on component unmount
    return () => {
      supabase.removeChannel(channel);
    };
  }, [queryClient]);

  // ... rest of the component JSX
}
With this addition, our app now has a live feed. Any new post inserted into the database will instantly appear at the top of the list on all connected clients. This same pattern can be used for real-time comments, notifications, and more.
Expanding with a Web Admin Panel
A common requirement for a news app is an admin dashboard to manage content. Since our Supabase backend is just a REST and GraphQL API, we can easily build a web frontend for it. This is where frameworks mentioned in Next.js News or Remix News shine. You could build a full-featured, server-rendered admin panel using Next.js, which would communicate with the exact same Supabase backend, demonstrating the true power of a decoupled architecture. This approach also allows for better SEO and performance on the web. Other frameworks like Gatsby News or Blitz.js News could also be excellent choices depending on the specific requirements of the admin panel.
Section 4: Testing, Deployment, and Best Practices
Building features is only half the battle. A production-ready application requires a solid testing strategy, a streamlined deployment process, and a focus on performance.

A Robust Testing Strategy
Testing is non-negotiable for ensuring application quality and stability. Your testing strategy should be multi-layered:
- Unit & Component Testing: Use Jest News as your test runner and React Testing Library News to write tests that simulate user behavior on your components. This ensures individual pieces of your UI work as expected.
- End-to-End (E2E) Testing: For React Native, the de facto standard is Detox News. It runs your app on a simulator or real device and interacts with it like a real user, verifying critical user flows from start to finish (e.g., sign up -> view feed -> like a post). If you build a web companion, tools like Cypress News or Playwright News are the top contenders.
Deployment and Optimization
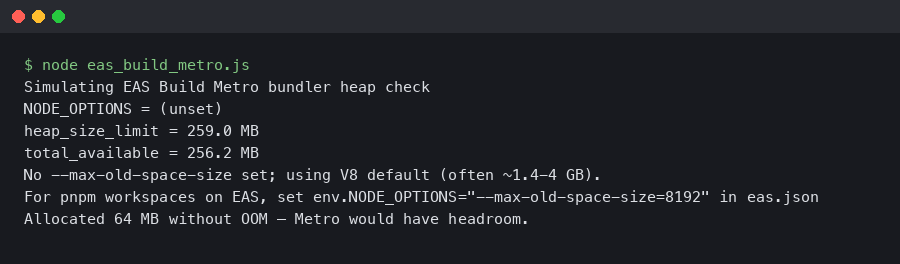
When you’re ready to ship, Expo Application Services (EAS) simplifies the process of building and submitting your app to the Apple App Store and Google Play Store. It handles all the complex native build tooling and code signing for you.
For performance, always keep these best practices in mind:
- List Optimization: Use `FlatList` or `FlashList` for displaying long lists of data to ensure only visible items are rendered.
- UI Performance: For complex animations and gestures that need to run smoothly on the UI thread, the latest React Native Reanimated News showcases its incredible power. It’s a must-have for creating fluid, native-feeling interactions.
- Backend Security: In Supabase, enable Row Level Security (RLS) on your tables. This is a critical security measure that ensures users can only access or modify data they are permitted to, enforced at the database level.
- Component Visualization: Use tools mentioned in Storybook News to develop and test your UI components in isolation. This can drastically speed up development and improve component reusability.
Conclusion: Your Path to Full-Stack Mastery
We’ve journeyed through the process of building a full-stack mobile application using the powerful duo of React Native and Supabase. We started by laying the foundation, then moved to core features like authentication and data fetching with React Query, and finally explored advanced real-time capabilities. This stack empowers you to move quickly, build robust features, and manage both frontend and backend with a unified JavaScript/TypeScript skillset.
The key takeaway is that modern tools have democratized full-stack development. You no longer need to be a separate frontend, backend, and database expert to build a complete product. By mastering a stack like this, you become a more versatile and effective developer. As a next step, consider exploring more advanced topics like offline-first support using a library like WatermelonDB, implementing push notifications, or adding data visualizations with libraries like Victory News. The possibilities are vast, and your journey as a full-stack mobile developer has just begun.