In the fast-paced world of mobile app development, ensuring a flawless user experience is paramount. While unit and component tests are essential for verifying individual pieces of logic, they don’t guarantee that all parts of your application work together seamlessly. This is where end-to-end (E2E) testing becomes critical. For developers in the React Native ecosystem, the challenge has always been finding a testing framework that is both powerful and reliable, avoiding the notorious flakiness that plagues traditional automation tools. Enter Detox, a gray-box E2E testing and automation library for React Native that has fundamentally changed the game.
Unlike black-box testers that have no knowledge of the app’s internal state, Detox synchronizes with your application’s asynchronous operations. This “gray-box” approach allows it to wait intelligently for network requests, animations, and timers to complete before proceeding, drastically reducing instability. This article provides a comprehensive overview of the latest in Detox News, guiding you from fundamental concepts and setup to advanced techniques and best practices, ensuring your React Native applications are as robust and reliable as possible.
The Core of Detox: Understanding Gray-Box E2E Testing
To truly appreciate what Detox brings to the table, it’s important to understand its position in the testing landscape. The testing pyramid is typically composed of unit tests at the base (using tools like Jest News), integration tests in the middle, and E2E tests at the top. While web developers have powerful tools like Cypress News and Playwright News, the mobile world presents unique challenges that Detox is specifically designed to solve.
What Makes Detox a “Gray-Box” Framework?
The key differentiator for Detox is its synchronization mechanism. Traditional E2E testing tools operate from a “black-box” perspective—they interact with the app just as a user would, but they are blind to its internal workings. This often leads to flaky tests where the test runner tries to interact with an element that hasn’t loaded yet, causing a failure. You end up littering your tests with arbitrary `sleep()` or `wait()` commands, which is an unreliable anti-pattern.
Detox, on the other hand, is a “gray-box” framework. It’s instrumented directly into your application, giving it visibility into the app’s event loop. It monitors:
- Network requests via libraries like
fetchoraxios. - Timers like
setTimeoutandsetInterval. - UI layout and animations, including those powered by React Native Reanimated News.
- The React Native bridge itself.
Detox will automatically wait for the app to become “idle” before executing the next action or expectation, virtually eliminating flakiness due to timing issues.
Setting Up Your First Detox Environment
Getting started with Detox involves a few key steps: installing the CLI, adding dependencies, and creating a configuration file. The central piece of this setup is the .detoxrc.json file, which defines your test configurations, including the build commands, device types, and the test runner.
Here’s a sample configuration for a React Native project managed with Expo News or the React Native CLI, targeting both iOS and Android.
{
  "testRunner": "jest",
  "runnerConfig": "e2e/jest.config.js",
  "skipLegacyWorkersInjection": true,
  "apps": {
    "ios.debug": {
      "type": "ios.app",
      "binaryPath": "ios/build/Build/Products/Debug-iphonesimulator/YourApp.app",
      "build": "xcodebuild -workspace ios/YourApp.xcworkspace -scheme YourApp -configuration Debug -sdk iphonesimulator -derivedDataPath ios/build"
    },
    "android.debug": {
      "type": "android.apk",
      "binaryPath": "android/app/build/outputs/apk/debug/app-debug.apk",
      "build": "cd android && ./gradlew assembleDebug assembleAndroidTest -DtestBuildType=debug && cd .."
    }
  },
  "devices": {
    "simulator": {
      "type": "ios.simulator",
      "device": {
        "type": "iPhone 14 Pro"
      }
    },
    "emulator": {
      "type": "android.emulator",
      "device": {
        "avdName": "Pixel_5_API_31"
      }
    }
  },
  "configurations": {
    "ios.sim.debug": {
      "device": "simulator",
      "app": "ios.debug"
    },
    "android.emu.debug": {
      "device": "emulator",
      "app": "android.debug"
    }
  }
}
Implementation Deep Dive: Writing and Structuring Tests
Once your environment is configured, you can start writing tests. A Detox test is typically structured within a describe block, with individual test cases in it blocks, a familiar pattern for anyone who has used Jest. The power lies in the global detox object, which provides methods to interact with your device and application elements.
Matchers, Actions, and Assertions
Every Detox test is composed of three fundamental steps:
- Matchers: Find a UI element. The most robust matcher is
by.id(), which looks for thetestIDprop on a component. Others includeby.text(),by.label(), andby.type(). - Actions: Interact with the matched element. Common actions are
.tap(),.typeText(),.scrollTo(), and.swipe(). - Assertions (Expectations): Verify the state of an element. You can check if an element
.toBeVisible(),.toHaveText(), or.toExist().
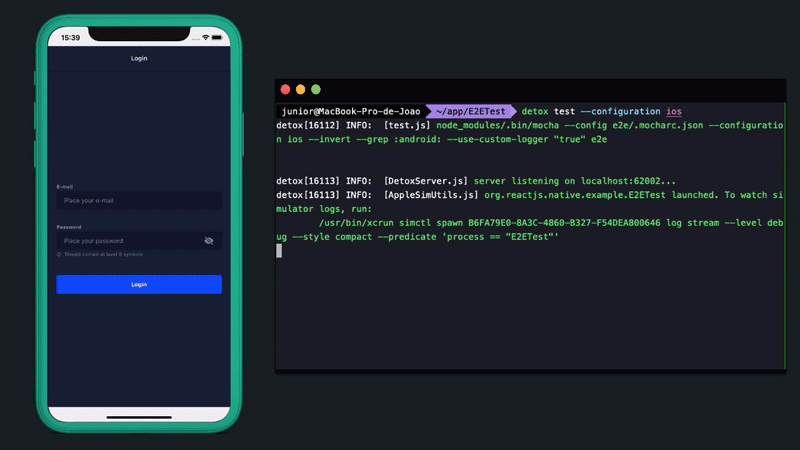
Let’s write a simple login flow test. This test will find the email and password input fields, type text into them, tap the login button, and then expect a welcome message to be visible on the home screen.
describe('Login Flow', () => {
  // Reset app state before each test
  beforeEach(async () => {
    await device.reloadReactNative();
  });

  it('should log in successfully with valid credentials', async () => {
    // 1. Match elements by their testID and perform actions
    await element(by.id('email-input')).typeText('[email protected]');
    await element(by.id('password-input')).typeText('password123');
    await element(by.id('login-button')).tap();

    // 2. Assert that the next screen is visible
    await expect(element(by.id('welcome-message'))).toBeVisible();
    await expect(element(by.text('Welcome, Test User!'))).toExist();
  });

  it('should show an error message with invalid credentials', async () => {
    await element(by.id('email-input')).typeText('[email protected]');
    await element(by.id('password-input')).typeText('wrongpassword');
    await element(by.id('login-button')).tap();

    // Assert that an error message appears
    await expect(element(by.id('error-message'))).toBeVisible();
    await expect(element(by.text('Invalid credentials. Please try again.'))).toExist();
  });
});
This example highlights a best practice: using testID for element selection. It decouples your tests from user-facing text or component structure, which can change frequently. This is crucial when working with UI component libraries like React Native Paper News or Tamagui News.
Advanced Detox Techniques for Complex Scenarios
Real-world applications are rarely as simple as a login screen. They involve complex navigation, asynchronous data, and dynamic UIs. Detox provides advanced features to handle these scenarios effectively.
Handling Authentication and Deep Linking
Running the full login flow for every single test is inefficient. A better approach is to bypass authentication using deep links or launch arguments. You can configure Detox to launch the app with specific parameters that your code can use to pre-authenticate the user or navigate to a specific screen.
You can add launch arguments in your .detoxrc.json or pass them directly via the command line. For example, you can use this to inject a mock authentication token.
// In your test file
describe('Authenticated Feature', () => {
  beforeAll(async () => {
    // Launch the app with mock user data and a flag to skip login
    await device.launchApp({
      newInstance: true,
      launchArgs: {
        mockUser: 'true',
        mockToken: 'fake-jwt-token-12345',
        initialScreen: 'Dashboard'
      },
    });
  });

  it('should display the user dashboard correctly', async () => {
    // The app is already logged in and on the dashboard screen
    await expect(element(by.id('dashboard-header'))).toBeVisible();
    await expect(element(by.id('user-profile-section'))).toExist();
  });
});
This technique is invaluable for testing features deep within your app’s navigation stack, especially in apps using sophisticated routing solutions like React Navigation News.

Mocking Network Requests
Your E2E tests should not depend on live backend services. Doing so makes them slow, unreliable, and difficult to reproduce. While Detox focuses on UI synchronization, it doesn’t have a built-in network mocking layer. The standard practice is to integrate a third-party mocking tool.
You can configure your app to point to a mock server when running in a test environment. This can be controlled via launch arguments or environment variables. This ensures your app, whether it uses Apollo Client News, Urql News, or React Query News for data fetching, receives consistent, predictable data during tests.
Integrating with CI/CD Pipelines
The ultimate goal is to automate your E2E tests. Integrating Detox into a CI/CD pipeline (like GitHub Actions, CircleCI, or Bitrise) ensures that every pull request is validated against key user flows. This involves setting up a virtual machine with the necessary environment (Xcode, Android SDK), building the app binary, running an emulator or simulator, and executing the Detox tests. While setup can be complex, the payoff in confidence and quality is immense.
Best Practices and the Broader Testing Ecosystem
Writing effective Detox tests is as much an art as a science. Following established best practices will ensure your test suite remains maintainable, fast, and reliable as your application grows.
Detox in a Complete Testing Strategy
It’s crucial to remember that Detox is not a silver bullet. It’s the top of the testing pyramid. Your testing strategy should be comprehensive:
- Unit Tests (Jest & React Testing Library): Use React Testing Library News to test individual components and business logic in isolation. This is fast and precise. It’s perfect for testing form logic handled by libraries like React Hook Form News or Formik News.
- Component/Integration Tests: Test how multiple components work together.
- E2E Tests (Detox): Verify complete user flows from start to finish on a real device or simulator. This is where you test that your state management (whether with Redux News, Zustand News, or Recoil News) correctly drives the UI across the entire application.
Key Best Practices for Maintainable Tests
- Always Use `testID`: Avoid relying on text or labels for selecting elements. `testID` is the most resilient selector.
- Page Object Model (POM): For larger apps, abstract your element selectors and common actions into “page objects.” This makes your tests more readable and easier to maintain. For example, create a `LoginPage` object with methods like `login(email, password)`.
- Keep Tests Independent and Focused: Each `it` block should test one specific behavior and should not depend on the state from a previous test. Use `beforeEach` to reset state.
- Leverage Artifacts for Debugging: Use Detox’s built-in support for taking screenshots and recording videos on failure. The `–take-screenshots all` and `–record-videos all` CLI flags are invaluable for debugging CI failures.
- Optimize for Speed: Use launch arguments to bypass slow processes like login or splash screens. Run tests in parallel where possible using Detox’s worker support.
Conclusion: The Future of React Native Testing is Gray
Detox has firmly established itself as the leading solution for reliable E2E testing in the React Native ecosystem. Its gray-box approach, which synchronizes with the app’s internal operations, effectively eliminates the flakiness that has long plagued mobile automation. By providing a stable foundation, developers can build comprehensive test suites that grant true confidence in their releases.
As the React Native landscape continues to evolve, with constant updates from frameworks like Next.js News and Remix News influencing the web-to-native story, the need for robust, native-first testing tools like Detox will only grow. By embracing its core principles, integrating it into your CI/CD pipeline, and following best practices, you can ensure your application not only works in theory but also delivers a seamless and bug-free experience to your users in the real world. Start by identifying a critical user flow in your app and write your first Detox test today.