The Definitive Guide to Testing Formik Forms with React Testing Library
In modern web development, forms are the linchpin of user interaction. They are the primary mechanism for data collection, from simple newsletter sign-ups to complex multi-step registration processes. Given their critical role, ensuring their reliability, accessibility, and correctness is non-negotiable. In the React ecosystem, Formik has long been a trusted ally for managing form state, validation, and submission logic with elegance and efficiency. However, building a great form is only half the battle; the other half is proving it works as expected through robust testing.
This is where React Testing Library (RTL) enters the picture. With its user-centric philosophy, RTL encourages us to write tests that resemble how real users interact with our application, leading to more confidence and less brittle test suites. Combining Formik’s powerful form management with RTL’s intuitive testing approach creates a formidable duo for building and maintaining high-quality React applications. This article dives deep into the practicalities of testing Formik forms, covering everything from initial setup and basic assertions to advanced scenarios like validation and asynchronous submissions. Whether you’re working with Next.js, Remix, or a classic Create React App, these principles will empower you to ship forms with confidence. This is essential reading for anyone following the latest Formik News and React Testing Library News.
Section 1: Core Concepts and Initial Setup
Before we write our first test, it’s crucial to understand the foundational principles of the tools we’re using. A solid grasp of Formik’s structure and React Testing Library’s philosophy will make the entire testing process more intuitive and effective.
Why Formik and React Testing Library?
Formik abstracts the complexities of form state management. It handles values, errors, and visited fields, integrates seamlessly with validation libraries like Yup, and streamlines submission handling. This lets developers focus on building the user interface and business logic. Key components like <Formik>, <Form>, <Field>, and the useFormik hook are central to its API.
React Testing Library, on the other hand, provides a set of tools for testing components from the user’s perspective. Its guiding principle is simple: “The more your tests resemble the way your software is used, the more confidence they can give you.” Instead of testing implementation details (e.g., “is this component’s state `isLoading: true`?”), we test user-facing behavior (e.g., “is the submit button disabled and showing a spinner?”). This approach makes tests more resilient to refactoring and focuses on what truly matters: the user experience. This philosophy is a recurring theme in recent React News and is applicable whether you’re using state management like Redux or newer alternatives discussed in Zustand News.
Setting Up the Component and Test Environment
Let’s start with a standard testing setup using Jest, which is often included with frameworks like Next.js or Create React App. You’ll need to install the following packages:
npm install --save-dev @testing-library/react @testing-library/jest-dom @testing-library/user-event jestNow, let’s create a simple login form component using Formik and Yup for validation. This component will be the subject of our tests throughout the article.

import React from 'react';
import { Formik, Form, Field, ErrorMessage } from 'formik';
import * as Yup from 'yup';

const LoginSchema = Yup.object().shape({
  email: Yup.string()
    .email('Invalid email address')
    .required('Email is required'),
  password: Yup.string()
    .min(8, 'Password must be at least 8 characters')
    .required('Password is required'),
});

export const SimpleLoginForm = ({ onSubmit }) => {
  return (
    <Formik
      initialValues={{ email: '', password: '' }}
      validationSchema={LoginSchema}
      onSubmit={(values, { setSubmitting }) => {
        // Simulate async submission
        setTimeout(() => {
          onSubmit(values);
          setSubmitting(false);
        }, 500);
      }}
    >
      {({ isSubmitting }) => (
        <Form>
          <div>
            <label htmlFor="email">Email Address</label>
            <Field type="email" name="email" id="email" />
            <ErrorMessage name="email" component="div" style={{ color: 'red' }} />
          </div>
          <div>
            <label htmlFor="password">Password</label>
            <Field type="password" name="password" id="password" />
            <ErrorMessage name="password" component="div" style={{ color: 'red' }} />
          </div>
          <button type="submit" disabled={isSubmitting}>
            {isSubmitting ? 'Submitting...' : 'Login'}
          </button>
        </Form>
      )}
    </Formik>
  );
};
Section 2: Writing Basic Integration Tests
With our component ready, we can start writing tests. Our initial goal is to verify that the form renders correctly and that we can simulate basic user interactions.
Testing the Initial Render
The first test should always confirm that the component renders without crashing and that the essential elements are visible to the user. We’ll use RTL’s `render` function and `screen` object to query the DOM.
The `screen` object provides a set of queries to find elements on the page. We should always prioritize accessible queries like `getByLabelText` or `getByRole`, as this ensures our application is usable by everyone and aligns our tests with the user experience.
import React from 'react';
import { render, screen } from '@testing-library/react';
import '@testing-library/jest-dom';
import userEvent from '@testing-library/user-event';
import { SimpleLoginForm } from './SimpleLoginForm';

describe('SimpleLoginForm', () => {
  test('renders the form with initial state', () => {
    const mockSubmit = jest.fn();
    render(<SimpleLoginForm onSubmit={mockSubmit} />);

    // Check if input fields are present using their accessible labels
    expect(screen.getByLabelText(/email address/i)).toBeInTheDocument();
    expect(screen.getByLabelText(/password/i)).toBeInTheDocument();

    // Check if the submit button is present and enabled
    const submitButton = screen.getByRole('button', { name: /login/i });
    expect(submitButton).toBeInTheDocument();
    expect(submitButton).not.toBeDisabled();
  });
});
This test provides a baseline of confidence. We know the form’s key interactive elements are rendered and available to the user. This approach is far superior to snapshot testing for forms, as it verifies behavior and accessibility rather than just the static markup.
Simulating User Input
Next, let’s test the core functionality: filling out the form. For this, we’ll use the `@testing-library/user-event` library. While RTL also provides `fireEvent`, `user-event` is recommended as it simulates full user interactions (including focus events, keyboard strokes, etc.) more realistically, catching bugs that `fireEvent` might miss. This is a key insight often highlighted in Jest News and testing tutorials.
We will simulate a user typing into the email and password fields. This test doesn’t check for submission yet, but confirms that the input fields correctly reflect user input.
Section 3: Advanced Testing: Validation and Submissions
A form’s true complexity lies in its validation and submission logic. This is where our tests provide the most value, ensuring data integrity and correct application flow. These patterns are crucial for anyone building with modern React frameworks, and this knowledge is relevant to those following Next.js News or Remix News.

Testing Validation Logic and Error Messages
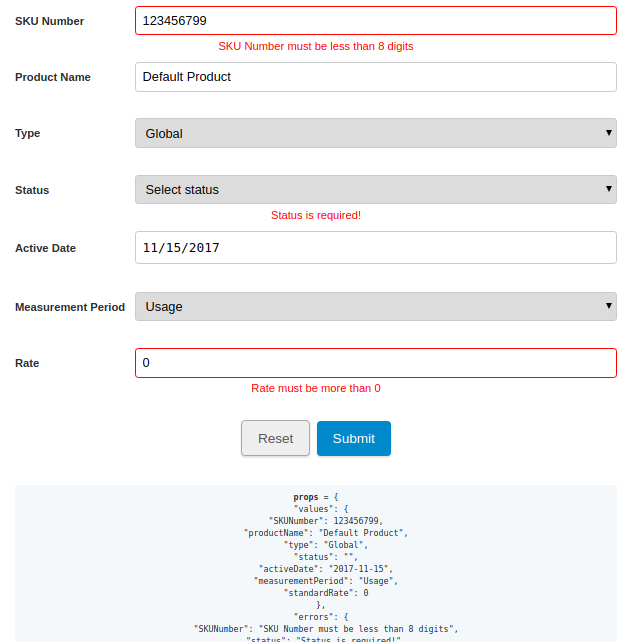
Our `SimpleLoginForm` uses Yup for validation. We need to test two primary scenarios: what happens when the user enters invalid data, and what happens when they enter valid data. Let’s start with the invalid case. We will simulate a user typing an invalid email and then attempting to submit, and we expect to see error messages appear.
import React from 'react';
import { render, screen, waitFor } from '@testing-library/react';
import '@testing-library/jest-dom';
import userEvent from '@testing-library/user-event';
import { SimpleLoginForm } from './SimpleLoginForm';

describe('SimpleLoginForm Validation', () => {
  test('shows validation errors for invalid input', async () => {
    const user = userEvent.setup();
    const mockSubmit = jest.fn();
    render(<SimpleLoginForm onSubmit={mockSubmit} />);

    // Get elements
    const emailInput = screen.getByLabelText(/email address/i);
    const passwordInput = screen.getByLabelText(/password/i);
    const submitButton = screen.getByRole('button', { name: /login/i });

    // 1. Type an invalid email
    await user.type(emailInput, 'invalid-email');

    // 2. Type a short password
    await user.type(passwordInput, '123');

    // 3. Click submit
    await user.click(submitButton);

    // Assert that error messages appear
    // We use findByText because the error messages appear asynchronously after validation
    expect(await screen.findByText(/invalid email address/i)).toBeInTheDocument();
    expect(await screen.findByText(/password must be at least 8 characters/i)).toBeInTheDocument();

    // Assert that the onSubmit function was NOT called
    expect(mockSubmit).not.toHaveBeenCalled();
  });
});
Notice the use of `async/await` and `findByText`. `userEvent` actions are asynchronous, and Formik’s validation can also be. The `findBy*` queries are perfect for this, as they wait for an element to appear in the DOM.
Mocking and Verifying Form Submission
The final and most critical test is verifying a successful submission. We need to ensure that when a user provides valid data and clicks submit, our `onSubmit` function is called with the correct values. We use `jest.fn()` to create a mock function that we can pass as the `onSubmit` prop. This allows us to spy on its calls without needing a real backend.
import React from 'react';
import { render, screen, waitFor } from '@testing-library/react';
import '@testing-library/jest-dom';
import userEvent from '@testing-library/user-event';
import { SimpleLoginForm } from './SimpleLoginForm';

describe('SimpleLoginForm Submission', () => {
  test('calls onSubmit with form values when form is valid', async () => {
    const user = userEvent.setup();
    const mockSubmit = jest.fn();
    render(<SimpleLoginForm onSubmit={mockSubmit} />);

    const emailInput = screen.getByLabelText(/email address/i);
    const passwordInput = screen.getByLabelText(/password/i);
    const submitButton = screen.getByRole('button', { name: /login/i });

    // Fill out the form with valid data
    const testValues = {
      email: 'test@example.com',
      password: 'password123',
    };
    await user.type(emailInput, testValues.email);
    await user.type(passwordInput, testValues.password);

    // Click the submit button
    await user.click(submitButton);

    // Check the button's submitting state
    // We use findByRole because the text change is async
    expect(await screen.findByRole('button', { name: /submitting.../i })).toBeDisabled();

    // Assert that onSubmit was called with the correct values
    await waitFor(() => {
      expect(mockSubmit).toHaveBeenCalledTimes(1);
      expect(mockSubmit).toHaveBeenCalledWith(testValues);
    });

    // Check if the button returns to its normal state after submission
    expect(screen.getByRole('button', { name: /login/i })).not.toBeDisabled();
  });
});
In this test, we also verify the loading state. By checking that the button text changes to “Submitting…” and becomes disabled, we confirm that Formik’s `isSubmitting` state is correctly wired to our UI. We use `waitFor` to handle the asynchronous nature of the submission and assertion. This level of integration testing is invaluable and provides much more confidence than siloed unit tests. For more complex scenarios, you might consider end-to-end tools, a topic often covered in Cypress News or Playwright News.
Section 4: Best Practices and Common Pitfalls
Writing effective tests is as much about following good practices as it is about knowing the syntax. Here are some key principles and common mistakes to avoid when testing Formik forms with RTL.
Best Practices to Follow
- Query by Accessibility First: Always prefer queries like `getByRole`, `getByLabelText`, and `getByText`. This makes your tests more robust and helps enforce accessible design. Use `data-testid` as a last resort.
- Embrace `user-event`: For simulating interactions, `@testing-library/user-event` is superior to `fireEvent`. It provides a more realistic simulation of user behavior, which can uncover subtle bugs.
- Test Behavior, Not Implementation: Avoid testing Formik’s internal state directly (e.g., `formik.values.email`). Instead, test the user-facing result. For example, check that an input field’s value has been updated or that an error message appears. This principle is universal, whether you’re testing a form or a component connected to a global store like Redux or Zustand.
- Use `waitFor` for Asynchronous Events: Whenever you perform an action that causes an asynchronous state update (like submitting a form or triggering validation), use `waitFor` or `findBy*` queries to wait for the expected outcome to appear in the DOM.
Common Pitfalls to Avoid
- Forgetting `await`: Most `user-event` methods and `findBy*` queries are asynchronous. Forgetting to `await` them is a common source of flaky or failing tests.
- Testing Third-Party Libraries: Do not test that Formik or Yup works. Trust that they are well-tested. Your job is to test that your code integrates with them correctly.
- Overusing `act()`: React Testing Library’s `render` and `userEvent` APIs are already wrapped in `act()`, so you rarely need to use it manually. Unnecessary `act()` wrappers can complicate tests.
Conclusion: Building Confidence Through User-Centric Testing
Testing forms doesn’t have to be a chore. By combining the power of Formik for state management and the user-centric philosophy of React Testing Library, we can create a testing suite that is both effective and maintainable. We’ve seen how to test a form’s initial state, simulate user input, verify complex validation logic, and confirm successful submission, all from the perspective of the end-user.
The key takeaway is to focus on testing the behavior of your components, not their internal implementation. This approach ensures that your tests provide real confidence in your application’s functionality and are resilient to future refactoring. As you continue your journey, consider applying these patterns to more complex forms, such as those with dynamic fields or multi-step wizards, and integrate these checks into your CI/CD pipeline to automate quality assurance. By mastering these techniques, you’ll be well-equipped to build reliable and robust forms in any React project.


