In today’s mobile-first world, location-based services are no longer a niche feature but a core component of countless applications. From ride-sharing and food delivery to social networking and navigation, interactive maps are essential for a rich user experience. For developers in the React Native ecosystem, the go-to solution for integrating this functionality is the powerful and versatile react-native-maps library. This library provides a bridge to the native map APIs on both iOS (Apple Maps) and Android (Google Maps), allowing for performant, feature-rich map implementations.
This comprehensive guide will walk you through everything you need to know to master react-native-maps. We’ll start with the initial setup and configuration, move on to rendering maps with interactive markers and callouts, explore advanced features like polygons and heatmaps, and finally, discuss crucial best practices for performance and testing. Whether you’re building your first location-aware app or looking to enhance an existing one, this article will provide the actionable insights and practical code examples you need. Keeping up with the latest React Native News is crucial, and understanding how to integrate fundamental libraries like this is key to building modern, robust applications with tools like Expo or the React Native CLI.
Setting the Foundation: Installation and Core Concepts
Before you can display beautiful, interactive maps, you need to lay the groundwork by installing the library and configuring the native platforms. This initial setup is often the most significant hurdle for developers, but getting it right ensures a smooth development process ahead.
Installation and Configuration
The installation process for react-native-maps differs slightly between Expo-managed projects and bare React Native projects. For Expo, the process is streamlined:
npx expo install react-native-maps
For bare React Native projects, you’ll use npm or yarn:
npm install react-native-maps or yarn add react-native-maps
The most critical step for Android is configuring your Google Maps API key. Without it, your map will not render. You need to:
- Go to the Google Cloud Console, create a new project, and enable the “Maps SDK for Android.”
- Create an API key and ensure it is properly restricted for security.
- Add the API key to your Android project in the
android/app/src/main/AndroidManifest.xmlfile:
<application>
  ...
  <meta-data
     android:name="com.google.android.geo.API_KEY"
     android:value="YOUR_GOOGLE_MAPS_API_KEY_HERE"/>
  ...
</application>
For iOS, react-native-maps will use Apple Maps by default, which requires no API key. However, if you wish to use Google Maps on iOS, you’ll need to follow the library’s documentation to install the Google Maps SDK and provide an API key in your AppDelegate.mm file.
Rendering Your First Map
Once configured, rendering a map is straightforward. The core component is <MapView />. Its most important prop is initialRegion, which defines the map’s starting position and zoom level.
A “region” object consists of four properties: latitude, longitude (the center point of the map), and latitudeDelta, longitudeDelta (the span of the map area to display, which effectively controls the zoom). Smaller delta values mean a more zoomed-in view.
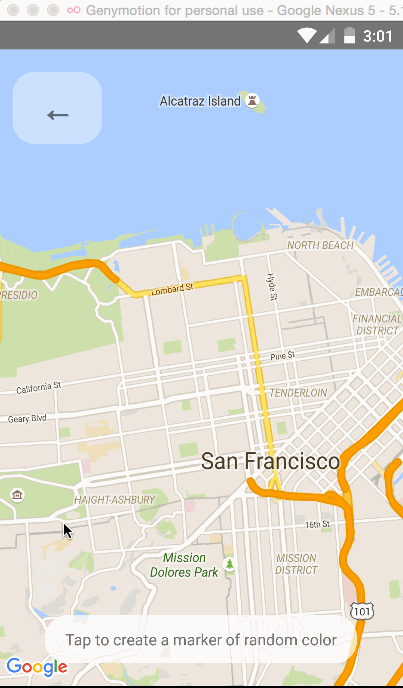
Here’s a basic example of a component that renders a map centered on San Francisco:
import React from 'react';
import { StyleSheet, View } from 'react-native';
import MapView, { PROVIDER_GOOGLE } from 'react-native-maps';

const App = () => {
  return (
    <View style={styles.container}>
      <MapView
        provider={PROVIDER_GOOGLE} // remove if not using Google Maps on iOS
        style={styles.map}
        initialRegion={{
          latitude: 37.78825,
          longitude: -122.4324,
          latitudeDelta: 0.0922,
          longitudeDelta: 0.0421,
        }}
      />
    </View>
  );
};

const styles = StyleSheet.create({
  container: {
    ...StyleSheet.absoluteFillObject,
    justifyContent: 'flex-end',
    alignItems: 'center',
  },
  map: {
    ...StyleSheet.absoluteFillObject,
  },
});

export default App;
It’s important to note the difference between initialRegion and region. Using initialRegion makes the map an uncontrolled component, where the user can freely pan and zoom. If you need to programmatically control the map’s viewport (e.g., to follow a user or animate to a new location), you would use the region prop and manage its state. This is where state management libraries can be useful; the latest Zustand News and Redux News show powerful patterns for managing complex UI state like this.
Bringing Your Map to Life: Markers, Callouts, and User Location
A static map is just a picture. The real power comes from adding interactive elements and context. Markers, callouts, and user location tracking transform the map from a passive view into an interactive experience.
Placing Markers on the Map
To place a pin on the map, you use the <Marker /> component as a child of <MapView />. At a minimum, a marker needs a coordinate prop. You can also provide a title and description, which typically appear in a default callout when the marker is tapped.
Often, you’ll want to display multiple markers based on data fetched from an API. You can achieve this by mapping over an array of location data. This is a perfect use case for data-fetching libraries; the latest React Query News and Apollo Client News highlight efficient ways to fetch, cache, and manage server state for scenarios just like this.
import React from 'react';
import { StyleSheet, View } from 'react-native';
import MapView, { Marker, Callout } from 'react-native-maps';
import { Text } from 'react-native';

// Mock data, in a real app this would come from an API
const locations = [
  { id: 1, title: 'Ferry Building', description: 'Historic marketplace', latlng: { latitude: 37.7955, longitude: -122.3937 } },
  { id: 2, title: 'Coit Tower', description: 'Art deco tower with murals', latlng: { latitude: 37.8024, longitude: -122.4058 } },
  { id: 3, title: 'Alcatraz Island', description: 'Former federal prison', latlng: { latitude: 37.8270, longitude: -122.4230 } },
];

const MapWithMarkers = () => {
  return (
    <MapView
      style={styles.map}
      initialRegion={{
        latitude: 37.79,
        longitude: -122.41,
        latitudeDelta: 0.0922,
        longitudeDelta: 0.0421,
      }}
    >
      {locations.map(marker => (
        <Marker
          key={marker.id}
          coordinate={marker.latlng}
          title={marker.title}
          description={marker.description}
        >
          <Callout tooltip>
            <View style={styles.calloutView}>
              <Text style={styles.calloutTitle}>{marker.title}</Text>
              <Text>{marker.description}</Text>
            </View>
          </Callout>
        </Marker>
      ))}
    </MapView>
  );
};

const styles = StyleSheet.create({
  map: { flex: 1 },
  calloutView: {
    padding: 10,
    backgroundColor: 'white',
    borderRadius: 6,
    borderColor: '#ccc',
    borderWidth: 0.5,
  },
  calloutTitle: {
    fontWeight: 'bold',
    fontSize: 16,
  },
});

export default MapWithMarkers;
Tracking the User’s Location
Displaying the user’s current location is a common requirement. First, you must request location permissions from the user. Once granted, you can enable user location on the map with a simple prop: showsUserLocation={true}. To make the map automatically center on and follow the user’s position, you can add followsUserLocation={true}. For more granular control over location updates, consider using a dedicated library like react-native-geolocation-service.
Advanced Mapping: Polygons, Heatmaps, and Custom Overlays
Beyond markers, react-native-maps offers a rich set of components for visualizing data and defining areas on the map. These advanced features can significantly enhance your application’s functionality.
Drawing Shapes: Polygons and Polylines
Polylines and Polygons allow you to draw lines and enclosed shapes on the map. A <Polyline /> is perfect for plotting a route, while a <Polygon /> is ideal for highlighting a specific area, such as a park, a delivery zone, or a geofence.
Both components take an array of coordinates and can be styled with properties like strokeColor, strokeWidth, and fillColor (for Polygons).
import React from 'react';
import MapView, { Polygon } from 'react-native-maps';

const parkBoundary = [
  { latitude: 37.772, longitude: -122.435 },
  { latitude: 37.773, longitude: -122.422 },
  { latitude: 37.76, longitude: -122.425 },
  { latitude: 37.759, longitude: -122.438 },
];

const MapWithPolygon = () => (
  <MapView
    style={{ flex: 1 }}
    initialRegion={{
      latitude: 37.765,
      longitude: -122.43,
      latitudeDelta: 0.04,
      longitudeDelta: 0.04,
    }}
  >
    <Polygon
      coordinates={parkBoundary}
      strokeColor="#000" // fallback for when `strokeColors` is not supported by the map-provider
      strokeWidth={2}
      fillColor="rgba(255, 0, 0, 0.3)"
    />
  </MapView>
);

export default MapWithPolygon;
Visualizing Data with Heatmaps

Heatmaps are an incredibly powerful tool for visualizing the density of data points. Instead of cluttering the map with thousands of markers, a heatmap can show areas of high concentration with intuitive color gradients. The <Heatmap /> component takes an array of points, where each point can optionally have a weight.
This is perfect for applications showing real estate prices, crime statistics, or ride-sharing demand hotspots. The latest Expo News often highlights new capabilities in the underlying native modules that make features like this even more performant.
Custom Map Styles
To create a unique look and feel that matches your app’s branding, you can apply custom styles to the map using a JSON object. Google provides a Styling Wizard to visually create these styles. Once you have your JSON, you pass it to the customMapStyle prop on the <MapView /> component. This allows you to create dark mode maps, simplified roadmaps, or any other aesthetic you can imagine.
Performance Optimization and Best Practices
While react-native-maps is highly performant, you can run into issues, especially when dealing with a large number of interactive elements. Following best practices is key to a smooth user experience.
Optimizing Performance with Many Markers
Rendering thousands of markers can cause significant performance degradation. The most effective solution is marker clustering. Libraries like react-native-map-clustering group nearby markers into a single cluster at higher zoom levels, which then expands as the user zooms in. This dramatically reduces the number of views that need to be rendered at any given time.
Another critical performance tip involves the tracksViewChanges prop on the <Marker /> component. By default, this is enabled to allow for animated and custom markers. However, for a static marker whose appearance never changes, you should explicitly set tracksViewChanges={false}. This prevents the map from re-rendering the marker view on every frame, saving significant resources.

State Management and Integration
Integrating maps into a larger application requires thoughtful state management. For complex interactions, relying on component state can become cumbersome. This is where a global state manager comes in handy. The latest trends in Recoil News and Jotai News showcase lightweight, atom-based approaches that are well-suited for managing UI state like the current map region or selected markers.
Furthermore, a map screen rarely exists in isolation. It needs to be integrated with other parts of your app. For instance, tapping a marker’s callout might need to navigate to a detail screen. This is a job for a navigation library, and the latest React Navigation News details robust patterns for handling complex navigation flows between screens.
Testing Location-Based Features
Testing components that rely on native device features like GPS can be challenging. For end-to-end testing, tools like Detox are invaluable. As highlighted in recent Detox News, you can mock GPS coordinates to simulate user movement and verify that your application logic responds correctly. For component-level testing of the UI around your map, tools like React Testing Library News allow you to test your components’ logic without needing to render a full native map, ensuring your UI state updates as expected.
Conclusion: Charting Your Course
We’ve journeyed from the initial setup of react-native-maps to implementing advanced, interactive features. You’ve learned how to render maps, add markers and callouts, draw shapes, visualize data with heatmaps, and apply custom styling. Most importantly, we’ve covered the critical best practices for performance optimization and testing that separate a proof-of-concept from a production-ready application.
The react-native-maps library is a deep and powerful tool. The key takeaways are to handle the initial native configuration with care, be mindful of performance when rendering many elements, and leverage the broader React Native ecosystem for state management, navigation, and testing. As you continue your development, always refer to the official documentation for the latest updates and explore the full range of props and components available. With this knowledge, you are now well-equipped to build the next generation of compelling, location-aware mobile applications.