In the world of modern web development, Single-Page Applications (SPAs) have become the standard for creating fast, fluid, and engaging user experiences. Unlike traditional multi-page websites that require a full page reload for every interaction, SPAs dynamically update content on the client-side, creating a seamless, app-like feel. At the heart of every React-based SPA is a robust routing library, and for years, React Router has been the undisputed leader. It provides the essential tools to manage navigation, synchronize the UI with the URL, and build complex, feature-rich applications.
This guide will take you on a deep dive into react-router-dom, the library for using React Router in web applications. We’ll start with the fundamental concepts, move on to practical implementation with dynamic and nested routes, explore advanced data loading patterns, and finish with performance optimization and best practices. Whether you’re building a simple portfolio or a complex enterprise dashboard, mastering React Router is a critical skill for any React developer. This knowledge is foundational, even when working with meta-frameworks like Next.js News or Remix News, which build upon these core routing principles.
Understanding the Fundamentals of React Router
Before we can build complex navigation flows, we need to grasp the core components that form the foundation of React Router. These components work together to create a declarative routing system that maps your application’s URLs to your React components.
Setting Up Your Project
Getting started is straightforward. If you have a React project set up (perhaps with a modern tool like Vite News), you can add React Router with a single command:
# Using npm
npm install react-router-dom

# Using yarn
yarn add react-router-dom
The Core Components: BrowserRouter, Routes, and Route
React Router’s primary components provide the structure for your application’s navigation. Understanding their roles is the first step to effective implementation.
<BrowserRouter>: This is the parent component that should wrap your entire application (or at least the part of it that needs routing). It uses the HTML5 History API (pushState,replaceState, and thepopstateevent) to keep your UI in sync with the URL without causing a full page refresh.<Routes>: This component acts as a container for all your individual routes. It intelligently scans its children<Route>elements and renders the one that best matches the current URL.<Route>: This is where the magic happens. Each<Route>component defines a mapping between a URL path and a React component. It takes two main props:path(the URL path to match) andelement(the component to render when the path matches).<Link>: To navigate between routes, you use the<Link>component instead of a standard<a>tag. This prevents the browser from making a full page request and instead tells React Router to handle the URL change internally.
Basic Routing Example
Let’s put these components together to create a simple application with a navigation bar and three distinct pages: Home, About, and Dashboard.
import React from 'react';
import { BrowserRouter, Routes, Route, Link } from 'react-router-dom';

// Define some simple page components
const HomePage = () => <h1>Home Page</h1>;
const AboutPage = () => <h1>About Us</h1>;
const DashboardPage = () => <h1>User Dashboard</h1>;

function App() {
  return (
    <BrowserRouter>
      <div>
        <nav>
          <ul style={{ listStyleType: 'none', padding: 0, display: 'flex', gap: '1rem' }}>
            <li>
              <Link to="/">Home</Link>
            </li>
            <li>
              <Link to="/about">About</Link>
            </li>
            <li>
              <Link to="/dashboard">Dashboard</Link>
            </li>
          </ul>
        </nav>

        <hr />

        {/* The <Routes> component renders the matched route's element */}
        <Routes>
          <Route path="/" element={<HomePage />} />
          <Route path="/about" element={<AboutPage />} />
          <Route path="/dashboard" element={<DashboardPage />} />
        </Routes>
      </div>
    </BrowserRouter>
  );
}

export default App;
Building a Dynamic Navigation System
Static pages are a good start, but real-world applications require dynamic content based on user input or data from an API. React Router provides powerful tools for handling dynamic segments in URLs and for navigating programmatically.
Dynamic Route Matching with URL Parameters
Often, you’ll need to create routes that follow a pattern, like displaying a specific user’s profile via a URL like /users/123. React Router handles this with URL parameters, denoted by a colon (:) in the route’s path. The useParams hook gives your component access to these dynamic values.
import React from 'react';
import { BrowserRouter, Routes, Route, Link, useParams } from 'react-router-dom';

// Mock user data
const users = {
  '1': { name: 'Alice', email: '[email protected]' },
  '2': { name: 'Bob', email: '[email protected]' },
};

const UserListPage = () => (
  <div>
    <h2>Users</h2>
    <ul>
      <li><Link to="/users/1">Alice</Link></li>
      <li><Link to="/users/2">Bob</Link></li>
    </ul>
  </div>
);

const UserProfilePage = () => {
  // useParams() returns an object of key/value pairs of URL parameters
  const { userId } = useParams();
  const user = users[userId];

  if (!user) {
    return <h2>User not found!</h2>;
  }

  return (
    <div>
      <h2>User Profile</h2>
      <p><strong>Name:</strong> {user.name}</p>
      <p><strong>Email:</strong> {user.email}</p>
    </div>
  );
};

const App = () => (
  <BrowserRouter>
    <Routes>
      <Route path="/" element={<UserListPage />} />
      {/* The :userId part is a dynamic segment */}
      <Route path="/users/:userId" element={<UserProfilePage />} />
    </Routes>
  </BrowserRouter>
);

export default App;
Programmatic Navigation with useNavigate
Sometimes you need to redirect a user based on an action, such as after a successful form submission or login. The useNavigate hook provides a function to imperatively change the location. This is a common pattern when working with form libraries like React Hook Form News or Formik News.
import React, { useState } from 'react';
import { BrowserRouter, Routes, Route, useNavigate } from 'react-router-dom';

const LoginPage = () => {
  const navigate = useNavigate();
  const [username, setUsername] = useState('');

  const handleLogin = (e) => {
    e.preventDefault();
    // In a real app, you would validate credentials here
    if (username) {
      console.log(`Logging in as ${username}`);
      // Navigate to the dashboard after successful login
      navigate('/dashboard');
    }
  };

  return (
    <form onSubmit={handleLogin}>
      <h2>Login</h2>
      <input
        type="text"
        placeholder="Enter username"
        value={username}
        onChange={(e) => setUsername(e.target.value)}
      />
      <button type="submit">Login</button>
    </form>
  );
};

const DashboardPage = () => <h1>Welcome to your Dashboard!</h1>;

const App = () => (
  <BrowserRouter>
    <Routes>
      <Route path="/" element={<LoginPage />} />
      <Route path="/dashboard" element={<DashboardPage />} />
    </Routes>
  </BrowserRouter>
);

export default App;
Advanced Routing Patterns and Data Loading
As your application grows, you’ll encounter more complex requirements like shared layouts, protected routes, and efficient data fetching. The latest React Router News includes powerful features inspired by full-stack frameworks to address these challenges head-on.
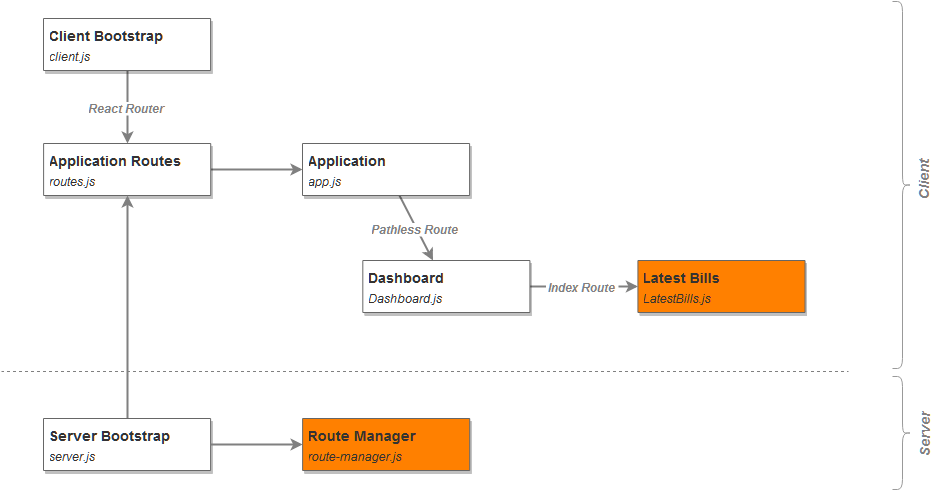
Nested Routes and the <Outlet /> Component
Nested routes are perfect for creating UIs with persistent components, such as a dashboard with a sidebar that stays visible while the main content area changes. You define child routes inside a parent route, and the parent component uses the <Outlet /> component to specify where the child route’s element should be rendered.
import React from 'react';
import { BrowserRouter, Routes, Route, Link, Outlet } from 'react-router-dom';

const DashboardLayout = () => (
  <div style={{ display: 'flex' }}>
    <aside style={{ width: '200px', borderRight: '1px solid #ccc', padding: '1rem' }}>
      <h3>Dashboard Menu</h3>
      <ul>
        <li><Link to="/dashboard">Overview</Link></li>
        <li><Link to="/dashboard/profile">Profile</Link></li>
        <li><Link to="/dashboard/settings">Settings</Link></li>
      </ul>
    </aside>
    <main style={{ flex: 1, padding: '1rem' }}>
      {/* Child routes will be rendered here */}
      <Outlet />
    </main>
  </div>
);

const Overview = () => <h2>Dashboard Overview</h2>;
const Profile = () => <h2>User Profile</h2>;
const Settings = () => <h2>Application Settings</h2>;
const NotFound = () => <h1>404 - Not Found</h1>;

const App = () => (
  <BrowserRouter>
    <Routes>
      {/* Parent Route with nested children */}
      <Route path="/dashboard" element={<DashboardLayout />}>
        {/* Index route for the parent path */}
        <Route index element={<Overview />} />
        <Route path="profile" element={<Profile />} />
        <Route path="settings" element={<Settings />} />
      </Route>
      {/* Catch-all route for 404 pages */}
      <Route path="*" element={<NotFound />} />
    </Routes>
  </BrowserRouter>
);

export default App;
Modern Data Loading with Loaders
Traditionally, data fetching in React components was handled inside a useEffect hook. This often led to loading spinners and complex state management. React Router v6.4 introduced data-loading APIs (loader functions) that allow you to fetch data *before* your component renders. This pattern, heavily influenced by Remix News, simplifies data flow and error handling. It can also work alongside powerful data-fetching libraries like React Query News or Apollo Client News to manage caching and synchronization.
Protected Routes for Authentication
Most applications have areas that should only be accessible to logged-in users. You can create a “protected route” by creating a wrapper component that checks for an authentication status (e.g., from a context, or a state management library like Redux News or Zustand News) and redirects the user to a login page if they are not authenticated.
Best Practices and Performance Optimization
Writing functional routes is one thing; writing performant and maintainable ones is another. Following best practices ensures your application remains fast and scalable as it grows.
Code Splitting with React.lazy and Suspense
For large applications, bundling all your code into a single JavaScript file can lead to slow initial load times. Code splitting allows you to split your code into smaller chunks that are loaded on demand. React’s built-in React.lazy() and <Suspense> components integrate seamlessly with React Router to enable route-based code splitting. This is especially useful for heavy components like data visualizations built with libraries like Victory News or Recharts News.
import React, { Suspense, lazy } from 'react';
import { BrowserRouter, Routes, Route, Link } from 'react-router-dom';

const HomePage = () => <h1>Home Page</h1>;

// Lazily load the AnalyticsDashboard component
const AnalyticsDashboard = lazy(() => import('./AnalyticsDashboard'));

const App = () => (
  <BrowserRouter>
    <nav>
      <Link to="/">Home</Link> | <Link to="/analytics">Analytics</Link>
    </nav>
    <hr />
    <Routes>
      <Route path="/" element={<HomePage />} />
      <Route
        path="/analytics"
        element={
          <Suspense fallback={<div>Loading Dashboard...</div>}>
            <AnalyticsDashboard />
          </Suspense>
        }
      />
    </Routes>
  </BrowserRouter>
);

// In a separate file: ./AnalyticsDashboard.js
// const AnalyticsDashboard = () => <h1>This is a heavy analytics dashboard!</h1>;
// export default AnalyticsDashboard;
Testing Routed Components
Testing is crucial for building reliable applications. When testing components that use React Router’s hooks or components, you’ll get an error if they aren’t rendered inside a router context. The solution is to wrap your component in a <MemoryRouter> during tests. This special router is designed for testing environments as it manages its history in memory, not in the browser’s address bar. This approach works perfectly with modern testing tools like React Testing Library News and Jest News.
Considerations for React Native
While this article focuses on react-router-dom for the web, it’s worth noting that the world of React Native News has its own set of navigation tools. The most popular library is React Navigation News, which provides a similar declarative approach but is built specifically for the native stack on iOS and Android. The core concepts of mapping paths to screens, handling parameters, and creating nested navigators are philosophically similar, making your web routing knowledge a valuable asset in mobile development with Expo News.
Conclusion: Your Next Steps with React Router
We’ve journeyed from the basic building blocks of React Router to advanced patterns for data loading, code splitting, and application architecture. You now have a solid understanding of how to create dynamic, multi-page experiences within a single-page application using react-router-dom. You’ve seen how to define routes, handle URL parameters, create nested layouts with shared UI, and optimize your application’s performance.
The key takeaway is that React Router is more than just a library for rendering components based on a URL; it’s a powerful tool for structuring your entire application. As you move forward, I encourage you to explore the official documentation to learn more about the data APIs, which are a game-changer for modern React development. By applying these principles, you’ll be well-equipped to build sophisticated, scalable, and user-friendly React applications.